Last week the team was getting ready for the jBPM 4.2 release. As usual this mainly consists of doing manual testing in order to prevent our dear users from having really nasty surprises when, full of hope, they download and install their brand new toy. One of my tests consisted in developing a very simple, one page application that shows how to get started with jBPM in combination with JSF. In this post I will describe the development of this small application.
The Idea
The main purpose of the application is to show a list of all the processes that are deployed in a default jBPM installation. The result is shown in the image below.
Setting up jBPM
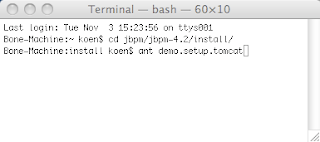
If you are a have not the first thing to do is download jBPM archive and extract it to your favorite location. To complete the installation, just use the 'demo.setup.tomcat' target of the 'build.xml' script in the 'install' folder.

As documented in the User Guide this script will:
- Download and install Tomcat into ${jbpm.home}/apache-tomat-6.0.20
- Install jBPM into that Tomcat installation
- Install the HSQLDB and start it in the background
- Create the DB schema
- Start Tomcat in the background
- Create an examples.bar business archive and deploy it
- Load the example users and groups
- Download and install Eclipse into ${jbpm-home}/eclipse
- Install the jBPM web console
- Install the Signavio web modeler
Create the Project
Just launch Eclipse if it is not already running and create a new project in your workspace. The initial layout of this project is illustrated above. As you can see there is a 'JavaSource' folder and a 'WebContent' folder. The target folder for the compiled Java class files is set to be 'WebContent/WEB-INF/classes'. In addition I created the following build.xml file.
Getting Ready for JSF
I want to show how to use JSF so let's add the needed boilerplate elements for this technology:
- web.xml in the WEB-INF folder:
 faces-config.xml in the WEB-INF folder:
 jsf-api.jar, jsp-impl.jar and jstl-1.2.jar in the WEB-INF/lib folder:
You also could add these files to the lib folder of your Tomcat installation. In case you are wondering where these libraries come from, I used the jsf-api.jar and jsp-impl.jar that are included in the latest release of the Mojarra project. Likewise the JSTL library can be downloaded here.
The layout of the WebContent folder after performing these steps is shown above.
Adding two pages
Let's add some minimal content to our application and deploy it to check whether we did everything right:
- Create a images folder in the WebContent folder and add a nice image called jbpm.png:
 Create a pages folder in the WebContent folder and create the definitions.jsp file:
 Create a file called index.jsp in the WebContent folder:
 The resulting layout of these previous steps is shown below.
 Now we can deploy our application by executing the 'deploy' target of our build file. After this is done we can navigate to http://localhost:8080/HelloMyJbpm/ and the resulting image should be similar to the one below.
Use the jBPM API in a Managed Bean
Finally! After all the previous steps we come at last to the point where we are going to use jBPM. To do this we are going to create a managed bean.
Before creating our managed bean however we have to make sure that our classpath is correct. We need to add the jBPM library to the classpath for the compilation to succeed. As you may have seen, this was already done in the build.xml file. If you are using Eclipse you might want to add the 'jBPM Libraries' classpath container to your buildpath as it is described in the docs.
The managed bean is a very complicated sounding name for an actually very simple Java class. Take a look at the image below.
You can see that there is not much to the ProcessEngineBean. It has a couple of static fields where a reference to the application wide available ProcessEngine and the RepositoryService are stored. These fields are lazily initialized upon the creation of the first bean. Additionally there is one public method that is called getDeployedProcessDefinitions. In this method the repository service is used to create a ProcessDefinitionQuery that basically returns a list of all the deployed processes in the database in ascending order of their name. Isn't it simple?
Now that we have our managed bean, let's take a look at how we can use this marvellous creation.
Using the ProcessEngineBean
The whole purpose of creating a managed bean is of course to use it in one of the pages of our application. So let's modify the definitions.jsp page that we created earlier to take advantage of the ProcessEngineBean and make sure that we can show something interesting instead of a dull welcome page. The modified page is shown below.
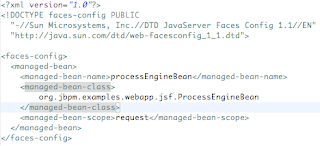
We can see that the datatable element is used to display a list of process definitions. The processEngineBean object that is used in the value expression of this element is in fact the managed bean that we developed in the previous step. But does our page know about this bean. In fact, it doesn't. We still have to register this bean in the faces-config.xml file. To do that we revisit this file and modify it so that it looks like the one below.

Finalization
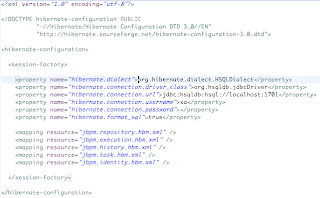
If we would deploy our application now and navigate to its homepage we would get an exception because the managed bean cannot be created. As a matter of fact to make the application work, we need to provide the jBPM configuration files. This configuration is read the first time a ProcessEngineBean is created. We will provide two more files that will reside as resources on the classpath of our application:
 The build script will make sure these files are included in the WEB-INF/classes folder of our web application so that they are on the applications classpath.
Hurray! We're done! Just use the build.xml one more time to invoke the deployment and reload the application's landing page at http://localhost:8080/HelloMyJbpm/. The result should look like the image below.


